
命令模式的目的是把请求调用封装起来。
假设我们需要用一个遥控器,这个遥控器有七个插槽,每一个插槽由两个按钮控制,我们需要通过每个插槽的两个按钮控制各种各样的设备,我们需要如何实现功能,并将请求和行为解耦。
这是设计方案一:
public interface Command {
    public void execute();
}
public class Light {
public void on() {
System.out.println("ligth on\n");
}
}public class LightOnCommand implements Command {
Light light;
public LightOnCommand(Light light) {
this.light = light;
}
@Override
public void execute() {
light.on();
}
}public class SimpleRemoteControl {
Command slot;
public SimpleRemoteControl() {}
public void setCommand(Command command) {
slot = command;
}
public void buttonWasPressed() {
slot.execute();
}
}public class RemoteControlTest {
public static void main(String[] args) {
SimpleRemoteControl remoteControl = new SimpleRemoteControl();
Light light = new Light();
LightOnCommand lightOnCommand = new LightOnCommand(light);
remoteControl.setCommand(lightOnCommand);
remoteControl.buttonWasPressed();
}
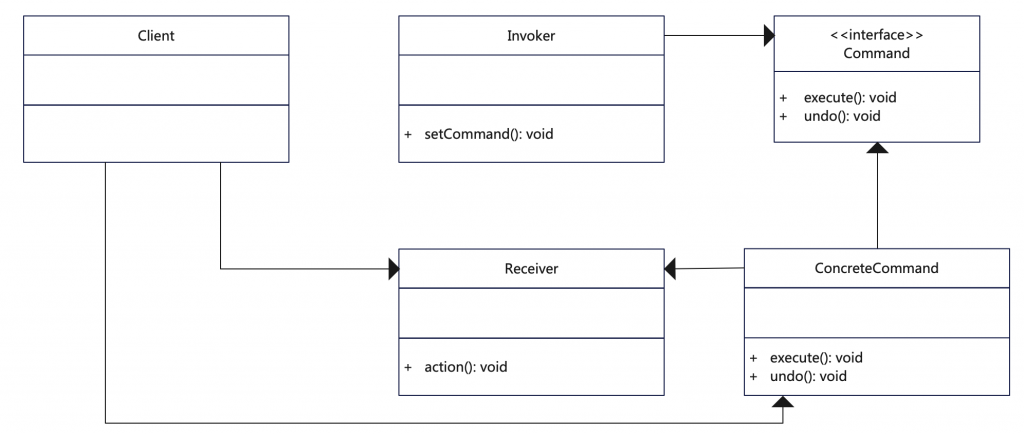
}命令模式的定义:命令模式将请求封装成对象,以便使用不同的请求、队列、或者日志来参数化其他对象。命令模式类图如下:
上面的设计方案是建立在只有一个按钮的情况下,实际情况是有复数个按钮控制着复数个设备,所以在控制器类中我们需要用数组或列表存储对应的命令对象,并且我们把按钮分为了开和关两类,这就是设计方案二:
public interface Command {
    public void execute();
}
public class RemoteControl {
Command[] onCommands;
Command[] offCommands;
public RemoteControl() {
onCommands = new Command[7];
offCommands = new Command[7];
Command noCommand = new NoCommand();
for (int i = 0; i < 7; i++) {
onCommands[i] = noCommand;
offCommands[i] = noCommand;
}
}
public void setCommand(int slot, Command onCommand, Command offCommand) {
onCommands[slot] = onCommand;
offCommands[slot] = offCommand;
}
public void onButtonWasPushed(int slot) {
onCommands[slot].execute();
}
public void offButtonWasPushed(int slot) {
offCommands[slot].execute();
}
public String toString() {
StringBuffer stringBuff = new StringBuffer();
stringBuff.append("\n------ Remote Control ------\n");
for (int i = 0; i < onCommands.length; i++) {
stringBuff.append("[slot " + i + "] " + onCommands[i].getClass().getName() + " " + offCommands[i].getClass().getName() + "\n");
}
return stringBuff.toString();
}
}public class NoCommand implements Command {
@Override
public void execute() {
}
}public class LightOnCommand implements Command {
Light light;
public LightOnCommand(Light light) {
this.light = light;
}
@Override
public void execute() {
light.on();
}
}public class LightOffCommand implements Command {
Light light;
public LightOffCommand(Light light) {
this.light = light;
}
@Override
public void execute() {
light.off();
}
}public class RemoteLoader {
public static void main(String[] args) {
RemoteControl remoteControl = new RemoteControl();
Light livingRoomLight = new Light("Living Room");
Light kitchenLight = new Light("Kitchen");
Stereo stereo = new Stereo("Living Room");
LightOnCommand livingRoomLightOn = new LightOnCommand(livingRoomLight);
LightOffCommand livingRoomLightOff = new LightOffCommand(livingRoomLight);
LightOnCommand kitchenLightOn = new LightOnCommand(kitchenLight);
LightOffCommand kitchenLightOff = new LightOffCommand(kitchenLight);
StereoOnWithCDCommand stereoOnWithCDCommand = new StereoOnWithCDCommand(stereo);
StereoOffCommand stereoOffCommand = new StereoOffCommand(stereo);
remoteControl.setCommand(0, livingRoomLightOn, livingRoomLightOff);
remoteControl.setCommand(1, kitchenLightOn, kitchenLightOff);
remoteControl.setCommand(2, stereoOnWithCDCommand, stereoOffCommand);
System.out.println(remoteControl);
remoteControl.onButtonWasPushed(0);
remoteControl.offButtonWasPushed(0);
remoteControl.onButtonWasPushed(1);
remoteControl.offButtonWasPushed(1);
remoteControl.onButtonWasPushed(2);
remoteControl.offButtonWasPushed(2);
}
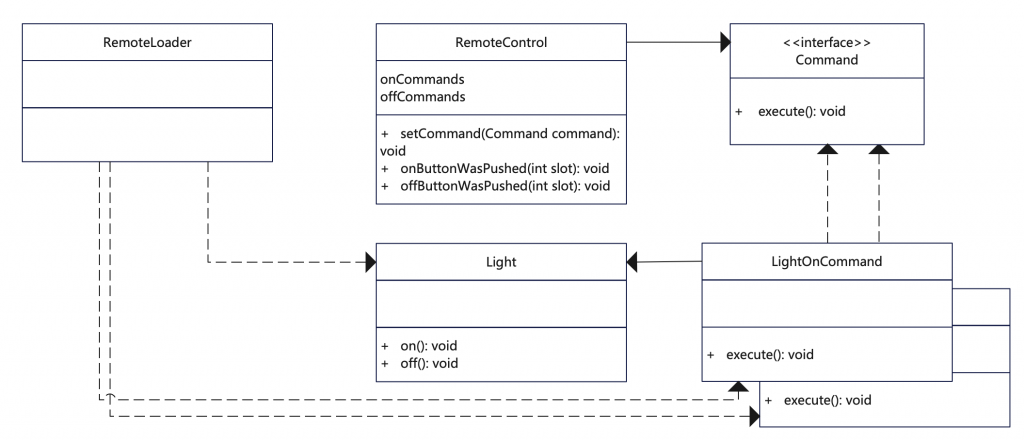
}第二种设计方案对控制器进行了优化:
- 将控制器中的命令存储对象改成了数组,这样就能存储复数个命令对象。
- 将按钮分为了’开’类型和’关’类型,与设备的正常使用相对应。
- 增加了NoCommand空对象替代在数组索引没有值时的为空判断。
第二种设计方案的类图如下:
在第二种设计方案上,我们在控制器中加入撤销功能后就形成了第三种设计方案:
public class RemoteControlWithUndo {
    Command[] onCommands;
    Command[] offCommands;
    Command undoCommand;

    public RemoteControlWithUndo() {
        onCommands = new Command[7];
        offCommands = new Command[7];

        Command noCommand = new NoCommand();
        for (int i = 0; i < 7; i++) {
            onCommands[i] = noCommand;
            offCommands[i] = noCommand;
        }
    }

    public void setCommand(int slot, Command onCommand, Command offCommand) {
        onCommands[slot] = onCommand;
        offCommands[slot] = offCommand;
    }

    public void onButtonWasPushed(int slot) {
        onCommands[slot].execute();
        undoCommand = onCommands[slot];
    }

    public void offButtonWasPushed(int slot) {
        offCommands[slot].execute();
        undoCommand = offCommands[slot];
    }

    public String toString() {
        StringBuffer stringBuff = new StringBuffer();
        stringBuff.append("\n------ Remote Control ------\n");
        for (int i = 0; i < onCommands.length; i++) {
            stringBuff.append("[slot " + i + "] " + onCommands[i].getClass().getName() + "  " + offCommands[i].getClass().getName() + "\n");
        }
        return stringBuff.toString();
    }
}
public class CeilingFan {
public static final int HIGH = 3;
public static final int MEDIUM = 2;
public static final int LOW = 1;
public static final int OFF = 0;
String location;
int speed;
public CeilingFan(String location) {
this.location = location;
}
public void high() {
speed = HIGH;
}
public void medium() {
speed = MEDIUM;
}
public void low() {
speed = LOW;
}
public void off() {
speed = OFF;
}
public int getSpeed() {
return speed;
}
}public class CeilingFanHighCommand implements Command {
CeilingFan ceilingFan;
int prevSpeed;
public CeilingFanHighCommand(CeilingFan ceilingFan) {
this.ceilingFan = ceilingFan;
}
@Override
public void execute() {
prevSpeed = ceilingFan.getSpeed();
ceilingFan.high();
}
public void undo() {
if (prevSpeed == CeilingFan.HIGH) {
ceilingFan.high();
} else if (prevSpeed == CeilingFan.MEDIUM) {
ceilingFan.medium();
} else if (prevSpeed == CeilingFan.LOW) {
ceilingFan.low();
} else if (prevSpeed == CeilingFan.OFF) {
ceilingFan.off();
}
}
}功能优化后我们就有了现有的代码设计。后续的功能优化是在之前命令模式代码框架的基础上进行了功能的完善和提升,使用的框架还是命令模式本身。
最后我们对命令模式作个总结:命令模式将请求封装成对象,这样能方便同类型请求的管理,包括队列化请求进行多线程控制以达到更方便的资源管理、日志化请求来增强请求的可靠性。
发表回复