
JUC并发包介绍
- java.util.concurrent。并发编程实用工具。
- java.util.concurrent.atomic。一个小的类工具包,支持对单个变量进行无锁线程安全编程。
- java.util.concurrent.locks。接口和类提供了用于锁定和等待条件的框架。这些条件不同于内置的同步和监视器。
JMM(Java Memory Model,java内存模型)
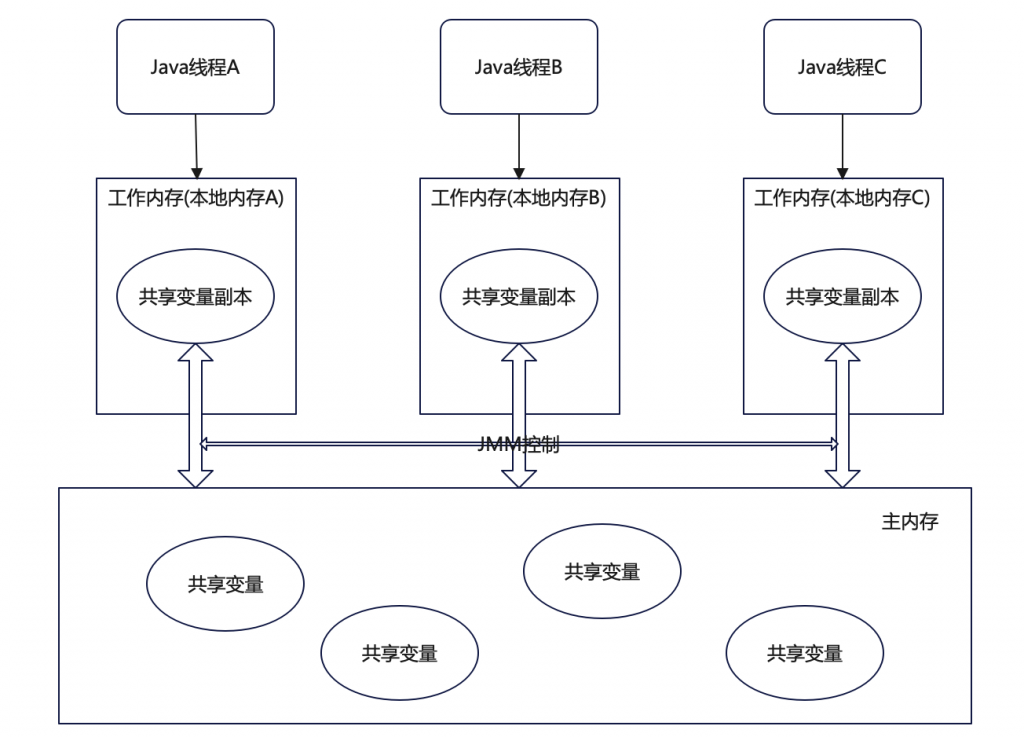
JMM是指java内存模型,不是JVM,不是所谓的栈、堆、方法区。
每个Java线程都有自己的工作内存。操作数据,首先从主内存中读,得到一份拷贝,操作完毕后再写回到主内存。
由于JVM运行程序的实体是线程,而每个线程创建时JVM都会为其创建一个工作内存(有些地方称为栈空间),工作内存是每个线程的私有数据区域,而Java内存模型中规定所有变量都存储在主内存,主内存是共享内存,所有线程都可以访问,但是线程对变量的操作(读取赋值等)必须在工作内存中进行,首先要将变量从主内存拷贝到自己的工作内存空间,然后对变量进行操作,操作完成后再将变量写回主内存,不能直接操作主内存中的变量,各个线程中的工作内存中存储着主内存中的变量副本拷贝,因此不同的线程间无法访问对方的工作内存,线程间的通信(传值)必须通过主内存来完成,期间访问过程如下图:
JMM可能带来可见性、原子性和有序性问题。
所谓可见性,就是某个线程对主内存内容的更改,应该立刻通知到其他线程。
所谓原子性,是指一个操作是不可分割的,不能执行到一半,就不执行了。
所谓有序性,就是指令是有序的,不会被重排。
Volatile关键字
volatile关键字是java提供的一种轻量级同步机制。
- 它能够提供可见性。
- 不能保证原子性。
- 禁止指令重排。
可见性测试
class MyData {
    volatile int number = 0;
    public void setTo60() {
        this.number = 60;
    }
}

/**
 * Volatile关键字的使用
 */
public class VolatileDemo {
    public static void main(String[] args) {
        volatileVisibilityDemo();
    }

    private static void volatileVisibilityDemo() {
        System.out.println("====可见性测试====");

        MyData myData = new MyData();
        new Thread(() -> {
            System.out.println(Thread.currentThread().getName() + "\t 执行");

            try {
                TimeUnit.SECONDS.sleep(3);
            } catch (InterruptedException e) {
                throw new RuntimeException(e);
            }

            myData.setTo60();

            System.out.println(Thread.currentThread().getName() + "\t 更新number值" + myData.number);
        }).start();

        // main线程
        // 保证上面的线程已经执行完毕,再进行main线程的执行
        while (myData.number == 0) {

        }
        System.out.println(Thread.currentThread().getName() + "/t main线程中获取number值" + myData.number);
    }
}
MyData类中的number加上volatile和不加是两种结果。不加volatile时主线程看不到子线程修改的结果。
原子性测试
class MyData {
    int number = 0;

    public void plusOne() {
        number++;
    }
}

public class VolatileDemo {
    public static void main(String[] args) {
        atomicDemo();
    }

    /**
     * 原子性测试
     * 需求:启动20个线程,每个线程执行1000次,number++操作,最终20个线程执行完毕后,number值是多少?
     */
    private static void atomicDemo() {
        System.out.println("====原子性测试====");

        MyData myData = new MyData();

        for (int i = 1; i <= 20; i++) {
            new Thread(() -> {
                for (int j = 0; j < 1000; j++) {
                    myData.plusOne();
                }
            }, String.valueOf(i)).start();
        }

        while(Thread.activeCount() > 2) {
            Thread.yield();
        }
        System.out.println(Thread.currentThread().getName() + "\t main线程中获取number值" + myData.number);
    }
}
输出结果不一定为20000,因为number++操作并不具有原子性。
解决方案1:
class MyData {
    int number = 0;

    public synchronized void plusOne() {
        number++;
    }
}

public class VolatileDemo {
    public static void main(String[] args) {
        atomicDemo();
    }

    /**
     * 原子性测试
     * 需求:启动20个线程,每个线程执行1000次,number++操作,最终20个线程执行完毕后,number值是多少?
     */
    private static void atomicDemo() {
        System.out.println("====原子性测试====");

        MyData myData = new MyData();

        for (int i = 1; i <= 20; i++) {
            new Thread(() -> {
                for (int j = 0; j < 1000; j++) {
                    myData.plusOne();
                }
            }, String.valueOf(i)).start();
        }

        while(Thread.activeCount() > 2) {
            Thread.yield();
        }
        System.out.println(Thread.currentThread().getName() + "\t main线程中获取number值" + myData.number);
    }
}
可以通过synchronized加锁来保证方法内操作的原子性,但是这种方式的运行效率很低。
解决方案2:
class MyData {
    AtomicInteger atomicInteger = new AtomicInteger();

    public void atomicPlusOne() {
        atomicInteger.getAndIncrement();
    }
}

/**
 * Volatile关键字的使用
 */
public class VolatileDemo {
    public static void main(String[] args) {
        atomicDemo();
    }

    /**
     * 原子性测试
     * 需求:启动20个线程,每个线程执行1000次,number++操作,最终20个线程执行完毕后,number值是多少?
     */
    private static void atomicDemo() {
        System.out.println("====原子性测试====");

        MyData myData = new MyData();

        for (int i = 1; i <= 20; i++) {
            new Thread(() -> {
                for (int j = 0; j < 1000; j++) {
                    myData.atomicPlusOne();
                }
            }, String.valueOf(i)).start();
        }

        while(Thread.activeCount() > 2) {
            Thread.yield();
        }
        System.out.println(Thread.currentThread().getName() + "\t main线程中获取atomic中的number值" + myData.atomicInteger.get());
    }
}
也可以通过Atomic对象来进行递增操作,这种方式相较于synchronized方式更加高效。
有序性测试
计算机在执行程序时,为了提高性能,编译器和处理器常常会对指令做重排,一般分为以下三种:

单线程环境里面确保程序最终执行结果和代码顺序执行的结果一致;
处理器在进行重排时必须要考虑指令之间的数据依赖性;
多线程环境中线程交替执行,由于编译器优化重排的存在,两个线程中使用的变量能否保证一致是无法确定的,结果无法预测。
volatile可以保证有序性,也就是防止指令重排。
所谓指令重排序,就是出于优化考虑,CPU执行指令的顺序更程序员自己编写的顺序不一致。
public class RestoreSeqDemo {
    int a = 0;
    volatile boolean flag = false;

    public void method1() {
        a = 1;
        flag = true;
    }

    public void method2() {
        if (flag) {
            a += 5;
            System.out.println("最终值a = " + a);
        }
    }

    public static void main(String[] args) {
        RestoreSeqDemo demo = new RestoreSeqDemo();
        new Thread(() -> {
            demo.method1();
        }, "ThreadA").start();
        new Thread(() -> {
            demo.method2();
        }, "ThreadB").start();
    }
}
flag变量不加volatile修饰时,flag=true指令可能会排在a=1指令前,这会导致出现a最终输出结果为5或1的情况。
双端检查锁(单例模式)
public class SingletonDemo {
    public static SingletonDemo instance = null;

    private SingletonDemo() {
        System.out.println(Thread.currentThread().getName() + "\t SingletonDemo构造方法执行了");
    }

    public static SingletonDemo getInstance() {
        if (instance == null) {
            instance = new SingletonDemo();
        }
        return instance;
    }

    public static void main(String[] args) {
        // 多线程操作
        for (int i = 0; i < 100000; i++) {
            new Thread(() -> {
                SingletonDemo.getInstance();
            }, String.valueOf(i)).start();
        }
    }
}
这段单例模式代码明显存在并发问题,getInstance方法并不是原子操作,可能存在多个线程同时进入if代码块的情况,所以需要进行代码优化,保证只创建出一个实例。
public class SingletonDemo {
    public static SingletonDemo instance = null;

    private SingletonDemo() {
        System.out.println(Thread.currentThread().getName() + "\t SingletonDemo构造方法执行了");
    }

    public static SingletonDemo getInstance() {
        if (instance == null) {
            synchronized (SingletonDemo.class) {
                if (instance == null) {
                    instance = new SingletonDemo();
                }
            }
        }
        return instance;
    }

    public static void main(String[] args) {
        // 多线程操作
        for (int i = 0; i < 100000; i++) {
            new Thread(() -> {
                SingletonDemo.getInstance();
            }, String.valueOf(i)).start();
        }
    }
}
优化后同一时间只能有一个线程进入synchronized方法体进行方法创建,但是仍然可能出现空指针等异常情况。
 0 getstatic #11 <JUC/SingletonDemo.instance : LJUC/SingletonDemo;>
 3 ifnonnull 37 (+34)
 6 ldc #12 <JUC/SingletonDemo>
 8 dup
 9 astore_0
10 monitorenter
11 getstatic #11 <JUC/SingletonDemo.instance : LJUC/SingletonDemo;>
14 ifnonnull 27 (+13)
17 new #12 <JUC/SingletonDemo>
20 dup
21 invokespecial #13 <JUC/SingletonDemo.<init> : ()V>
24 putstatic #11 <JUC/SingletonDemo.instance : LJUC/SingletonDemo;>
27 aload_0
28 monitorexit
29 goto 37 (+8)
32 astore_1
33 aload_0
34 monitorexit
35 aload_1
36 athrow
37 getstatic #11 <JUC/SingletonDemo.instance : LJUC/SingletonDemo;>
40 areturn
这是上段代码的字节码,其中instance = new SingletonDemo()对应于17、20、21、24行,字节码指令的作用分别是:
1. new,在内存中为新创建的对象开辟空间,如果首次加载类则进行类加载。
2. dup,赋值操作数栈栈顶数据并压入栈顶。
3. invokespecial,调用构造方法进行初始化。
4. putstatic,将创建的对象地址赋值给静态变量instance。
因为指令重排的原因,3、4步的操作可能会颠倒顺序,所以,可能存在对象引用已经有值,但是并没有被初始化的时刻(数据为乱码),这时另一个线程拿到对象使用会出现空指针等问题。
解决方法(用volatile修饰instance变量,防止指令重排):
public class SingletonDemo {
    public static volatile SingletonDemo instance = null;

    private SingletonDemo() {
        System.out.println(Thread.currentThread().getName() + "\t SingletonDemo构造方法执行了");
    }

    public static SingletonDemo getInstance() {
        if (instance == null) {
            synchronized (SingletonDemo.class) {
                if (instance == null) {
                    instance = new SingletonDemo();
                }
            }
        }
        return instance;
    }

    public static void main(String[] args) {
        // 多线程操作
        for (int i = 0; i < 100000; i++) {
            new Thread(() -> {
                SingletonDemo.getInstance();
            }, String.valueOf(i)).start();
        }
    }
}
CAS
CAS是CPU的一条原子指令(cmpxchg指令),因为它是一条原子指令,所以当条指令执行不会造成不一致性。指令逻辑是通过内存地址获取当前值后,和预期旧值进行比较,如果相等,就将对应内存地址的值改为预期值,如果不相等则什么都不做。
CAS底层原理
我们以AtomicInteger为的getAndIncrement方法为例,分析一下原子类是如何使用CAS方法实现整型递增操作的原子性的。
    public final int getAndIncrement() {
        return unsafe.getAndAddInt(this, valueOffset, 1);
    }
getAndIncrement方法体内调用的是Unsafe类的getAndAddInt方法。
    public final int getAndAddInt(Object var1, long var2, int var4) {
        int var5;
        do {
            var5 = this.getIntVolatile(var1, var2);
        } while(!this.compareAndSwapInt(var1, var2, var5, var5 + var4));

        return var5;
    }
从上面的方法传递可以看出,var1是对象地址,而var2是value值的地址偏移量,var4是递增量,该方法先通过getIntVolatile方法,拿到当前时间点共享变量的值,然后基于compareAndSwapInt方法的返回值进行循环判断,我们可以再来看下compareAndSwapInt方法的逻辑。
public final native boolean compareAndSwapInt(Object var1, long var2, int var4, int var5);可惜这是本地方法,是基于其他语言(C语言)实现的java调用的,要彻底搞清楚,我们需要再看看这个方法的C语言实现。
UNSAFE_ENTRY(Boolean, Unsafe_CompareAndSwapInt(JNIEnv *env, object unsafe, long obj, long offset, jint e, jint x))
    UnsafeWrapper("Unsafe_CompareAndSwapInt");
    oop p = JNIHandles::resolve(obj);
    jint* addr = (jint *) index_oop_from_field_offset_long(p, offset);
    return (jint)(Atomic::cmpxchg(x, addr, e)) == e;
UNSAFE_END
这里obj是对象地址,offset是value偏移量,e是旧值,x是期望值。
CAS缺点
- Java中很多CAS方法都有自旋锁逻辑,一直循环,开销比较大。我们可以看到getAndAddInt方法执行时,有个do while,如果CAS失败,会一直进行尝试。如果CAS长时间一直不成功,可能会给CPU带来很大的开销。
- 对一个共享变量执行操作时,我们可以使用循环CAS的方式来保证原子操作,但是对多个共享变量操作时,循环CAS就无法保证操作的原子性,这个时候就可以用锁来保证原子性。
- 引出了ABA问题。
CAS的ABA问题
public class ABADemo {
    public static void main(String[] args) {
        AtomicReference<Integer> atomicReference = new AtomicReference<>(100);
        demo01(atomicReference);
    }

    private static void demo01(AtomicReference<Integer> atomicReference) {
        System.out.println("====ABA问题产生====");

        new Thread(() -> {
            try {
                TimeUnit.SECONDS.sleep(2);
            } catch (InterruptedException e) {
                throw new RuntimeException(e);
            }
            System.out.println(atomicReference.compareAndSet(100, 2000) + "\t" + atomicReference.get());
        }, "ThreadA").start();

        new Thread(() -> {
            // CAS操作
            System.out.println(atomicReference.compareAndSet(100, 111));
            // CAS操作
            System.out.println(atomicReference.compareAndSet(111, 100));
        }, "ThreadB").start();
    }
}
初始值100,当ThreadB线程将值改为111并改回来时,ThreadA的CAS操作都能成功,这个过程中原子引用中的值实际已经发生了变化,只不过经历了两次修改后,值又回到了100,但部分场景下我们只希望程序基于最初的100进行CAS操作,那如何区别最初的100和经过修改后的100?我们可以通过版本号实现。
public class ABADemo {
    public static void main(String[] args) {
        AtomicStampedReference<Integer> atomicStampedReference = new AtomicStampedReference<>(100, 1);
        demo02(atomicStampedReference);
    }

    private static void demo02(AtomicStampedReference<Integer> atomicStampedReference) {
        System.out.println("====ABA问题的解决====");

        new Thread(() -> {
            int stamp = atomicStampedReference.getStamp();
            System.out.println("ThreadA====第一次获取的版本号====" + stamp);
            System.out.println("ThreadB====第一次获取的数据====" + atomicStampedReference.getReference());

            try {
                TimeUnit.SECONDS.sleep(4);
            } catch (InterruptedException e) {
                throw new RuntimeException(e);
            }

            boolean result = atomicStampedReference.compareAndSet(
                    100,
                    2000,
                    stamp,
                    stamp + 1
            );
            System.out.println("CAS比较的结果result====" + result);
            System.out.println("ThreadA====第二次获取的版本号====" + stamp);
            System.out.println("ThreadB====第二次获取的数据====" + atomicStampedReference.getReference());
        }, "ThreadA").start();

        new Thread(() -> {
            System.out.println("ThreadA====第一次获取的版本号====" + atomicStampedReference.getStamp());
            System.out.println("ThreadB====第一次获取的数据====" + atomicStampedReference.getReference());

            try {
                TimeUnit.SECONDS.sleep(1);
            } catch (InterruptedException e) {
                throw new RuntimeException(e);
            }

            atomicStampedReference.compareAndSet(
                    100,
                    111,
                    atomicStampedReference.getStamp(),
                    atomicStampedReference.getStamp() + 1
            );
            System.out.println("ThreadA====第二次获取的版本号====" + atomicStampedReference.getStamp());
            System.out.println("ThreadB====第二次获取的数据====" + atomicStampedReference.getReference());

            atomicStampedReference.compareAndSet(
                    111,
                    100,
                    atomicStampedReference.getStamp(),
                    atomicStampedReference.getStamp() + 1
            );
            System.out.println("ThreadA====第三次获取的版本号====" + atomicStampedReference.getStamp());
            System.out.println("ThreadB====第三次获取的数据====" + atomicStampedReference.getReference());
        }, "ThreadB").start();

    }
}
这里AtomicStampedReference类可以保存时间戳将其作为版本号来区别不同时间段但具有相同值的对象。
集合类不安全问题
多线程同时对集合进行操作时会出现ConcurrentModificationException异常:
public class ListNoSafeDemo {
    public static void main(String[] args) {
//        listDemo();
//        setDemo();
        mapDemo();
    }

    public static void mapDemo() {
        Map<String, String> map = new HashMap<>();
        for (int i = 1; i <= 10; i++) {
            new Thread(() -> {
                map.put(UUID.randomUUID().toString().substring(0, 8), UUID.randomUUID().toString().substring(0, 8));

                System.out.println(Thread.currentThread().getName() + "\t" + map);
            }, String.valueOf(i)).start();
        }
    }

    public static void setDemo() {
        HashSet<String> list = new HashSet<>();
        for (int i = 1; i <= 10; i++) {
            new Thread(() -> {
                list.add(UUID.randomUUID().toString().substring(0, 8));

                System.out.println(Thread.currentThread().getName() + "\t" + list);
            }, String.valueOf(i)).start();
        }
    }

    public static void listDemo() {
        List<String> list = new ArrayList<>();
        for (int i = 1; i <= 10; i++) {
            new Thread(() -> {
                list.add(UUID.randomUUID().toString().substring(0, 8));

                System.out.println(Thread.currentThread().getName() + "\t" + list);
            }, String.valueOf(i)).start();
        }
    }
}
可以使用并发包中的集合类进行操作来解决这个并发问题:
public class ListNoSafeDemo {
    public static void main(String[] args) {
//        listDemo();
//        setDemo();
        mapDemo();
    }

    public static void mapDemo() {
        Map<String, String> map = new ConcurrentHashMap<>();
        for (int i = 1; i <= 10; i++) {
            new Thread(() -> {
                map.put(UUID.randomUUID().toString().substring(0, 8), UUID.randomUUID().toString().substring(0, 8));

                System.out.println(Thread.currentThread().getName() + "\t" + map);
            }, String.valueOf(i)).start();
        }
    }

    public static void setDemo() {
        Set<String> list = new CopyOnWriteArraySet<>();
        for (int i = 1; i <= 10; i++) {
            new Thread(() -> {
                list.add(UUID.randomUUID().toString().substring(0, 8));

                System.out.println(Thread.currentThread().getName() + "\t" + list);
            }, String.valueOf(i)).start();
        }
    }

    public static void listDemo() {
        List<String> list = new CopyOnWriteArrayList<>();
        for (int i = 1; i <= 10; i++) {
            new Thread(() -> {
                list.add(UUID.randomUUID().toString().substring(0, 8));

                System.out.println(Thread.currentThread().getName() + "\t" + list);
            }, String.valueOf(i)).start();
        }
    }
}
锁相关
Synchronized
以下面代码为例,从各行为中探讨synchronized关键字的加锁特性:
案例1
class Phone {
    public synchronized void sendEmail() {
        System.out.println("sendEmail...");
    }

    public synchronized void sendMessage() {
        System.out.println("sendMessage...");
    }
}

/**
 * 先打印邮件还是先打印短信
 */
public class LockDemo {
    public static void main(String[] args) {
        Phone phone = new Phone();

        new Thread(() -> {
            phone.sendEmail();
        }, "A").start();

        try {
            TimeUnit.SECONDS.sleep(1);
        } catch (InterruptedException e) {
            throw new RuntimeException(e);
        }

        new Thread(() -> {
            phone.sendMessage();
        }, "B").start();
    }
}
场景:单个对象的标准加锁调用。
结果:先打印邮件,再打印消息。
原因:synchronized关键字基于实例对象进行加锁,所以A调用sendEmail时B调用的sendMessage会被锁住。
案例2
class Phone {
    public synchronized void sendEmail() {
        try {
            TimeUnit.SECONDS.sleep(3);
        } catch (InterruptedException e) {
            throw new RuntimeException(e);
        }
        System.out.println("sendEmail...");
    }

    public synchronized void sendMessage() {
        System.out.println("sendMessage...");
    }
}

/**
 * 先打印邮件还是先打印短信
 */
public class LockDemo {
    public static void main(String[] args) {
        Phone phone = new Phone();

        new Thread(() -> {
            phone.sendEmail();
        }, "A").start();

        try {
            TimeUnit.SECONDS.sleep(1);
        } catch (InterruptedException e) {
            throw new RuntimeException(e);
        }

        new Thread(() -> {
            phone.sendMessage();
        }, "B").start();
    }
}
场景:在Email方法中加入休眠代码,仍然是单个对象的加锁调用。
结果:先打印邮件,再打印消息。
原因:synchronized关键字基于实例对象进行加锁,所以A调用sendEmail时B调用的sendMessage会被锁住,这时在sendEmail中不管停顿多久,只要没有解锁,B线程的sendMessage就需要一直等待。
案例3:
class Phone {
    public synchronized void sendEmail() {
        try {
            TimeUnit.SECONDS.sleep(3);
        } catch (InterruptedException e) {
            throw new RuntimeException(e);
        }
        System.out.println("sendEmail...");
    }

    public synchronized void sendMessage() {
        System.out.println("sendMessage...");
    }

    public void hello() {
        System.out.println("hello...");
    }
}

/**
 * 先打印邮件还是先打印短信
 */
public class LockDemo {
    public static void main(String[] args) {
        Phone phone = new Phone();

        new Thread(() -> {
            phone.sendEmail();
        }, "A").start();

        try {
            TimeUnit.SECONDS.sleep(1);
        } catch (InterruptedException e) {
            throw new RuntimeException(e);
        }

        new Thread(() -> {
            phone.sendMessage();
        }, "B").start();

        new Thread(() -> {
            phone.hello();
        }, "C").start();
    }
}
场景:增加普通方法。
结果:先打印普通方法。
原因:普通方法并没有加锁,直接打印出来了。
案例4
class Phone {
    public synchronized void sendEmail() {
        try {
            TimeUnit.SECONDS.sleep(3);
        } catch (InterruptedException e) {
            throw new RuntimeException(e);
        }
        System.out.println("sendEmail...");
    }

    public synchronized void sendMessage() {
        System.out.println("sendMessage...");
    }

    public void hello() {
        System.out.println("hello...");
    }
}

/**
 * 先打印邮件还是先打印短信
 */
public class LockDemo {
    public static void main(String[] args) {
        Phone phone = new Phone();

        new Thread(() -> {
            phone.sendEmail();
        }, "A").start();

        try {
            TimeUnit.SECONDS.sleep(1);
        } catch (InterruptedException e) {
            throw new RuntimeException(e);
        }

        new Thread(() -> {
            phone.sendMessage();
        }, "B").start();

        new Thread(() -> {
            phone.hello();
        }, "C").start();
    }
}
案例5
class Phone {
    public synchronized void sendEmail() {
        try {
            TimeUnit.SECONDS.sleep(3);
        } catch (InterruptedException e) {
            throw new RuntimeException(e);
        }
        System.out.println("sendEmail...");
    }

    public synchronized void sendMessage() {
        System.out.println("sendMessage...");
    }

    public void hello() {
        System.out.println("hello...");
    }
}

/**
 * 先打印邮件还是先打印短信
 */
public class LockDemo {
    public static void main(String[] args) {
        Phone phone1 = new Phone();
        Phone phone2 = new Phone();

        new Thread(() -> {
            phone1.sendEmail();
        }, "A").start();

        try {
            TimeUnit.SECONDS.sleep(1);
        } catch (InterruptedException e) {
            throw new RuntimeException(e);
        }

        new Thread(() -> {
            phone2.sendMessage();
        }, "B").start();
    }
}
场景:两个对象分别调用两个synchronized修饰的方法。
结果:消息先打印,邮件后打印。
原因:两个对象,所以有两个锁,方法执行时互不影响,所以方法体重执行逻辑更快的消息方法更快打印。
案例6
class Phone {
    public static synchronized void sendEmail() {
        try {
            TimeUnit.SECONDS.sleep(3);
        } catch (InterruptedException e) {
            throw new RuntimeException(e);
        }
        System.out.println("sendEmail...");
    }

    public static synchronized void sendMessage() {
        System.out.println("sendMessage...");
    }

    public void hello() {
        System.out.println("hello...");
    }
}

/**
 * 先打印邮件还是先打印短信
 */
public class LockDemo {
    public static void main(String[] args) {
        Phone phone1 = new Phone();
        Phone phone2 = new Phone();

        new Thread(() -> {
            phone1.sendEmail();
        }, "A").start();

        try {
            TimeUnit.SECONDS.sleep(1);
        } catch (InterruptedException e) {
            throw new RuntimeException(e);
        }

        new Thread(() -> {
            phone2.sendMessage();
        }, "B").start();
    }
}
场景:两个方法是synchronized修饰的静态方法,并且有两个对象分别调用这两个方法。
结果:邮件先打印,消息后打印。
原因:静态方法是对类的字节码文件进行加锁的,所以两个对象调用的方法实质是基于同一个类字节码文件进行加锁处理,所以先拿到锁的邮件先打印完后解锁后消息方法才会执行。
案例7
class Phone {
    public synchronized void sendEmail() {
        try {
            TimeUnit.SECONDS.sleep(3);
        } catch (InterruptedException e) {
            throw new RuntimeException(e);
        }
        System.out.println("sendEmail...");
    }

    public static synchronized void sendMessage() {
        System.out.println("sendMessage...");
    }

    public void hello() {
        System.out.println("hello...");
    }
}

/**
 * 先打印邮件还是先打印短信
 */
public class LockDemo {
    public static void main(String[] args) {
        Phone phone1 = new Phone();
        Phone phone2 = new Phone();

        new Thread(() -> {
            phone1.sendEmail();
        }, "A").start();

        try {
            TimeUnit.SECONDS.sleep(1);
        } catch (InterruptedException e) {
            throw new RuntimeException(e);
        }

        new Thread(() -> {
            phone2.sendMessage();
        }, "B").start();
    }
}
场景:只有邮件方法是静态同步方法,消息方法仅是同步方法,同一个对象调用两个方法。
结果:消息方法先打印,邮件方法后打印。
原因:静态同步方法和非静态同步方法使用的是两个锁,一个是类字节码文件作为锁,一个是对象作为锁,互不影响,所以方法体中执行逻辑更快的先打印。
公平锁&非公平锁
可重入锁
可重入锁又叫递归锁,指的同一个线程在外层方法获得锁时,进入内层方法会自动获取锁。也就是说,线程可以进入任何一个它已经拥有锁的代码块。比如method01方法里面有method2方法,两个方法都有同一把锁,得到了method01的锁,就自动得到了method02的锁。
就像有了家门的锁,厕所、书房、厨房就为了你敞开了一样。可重入锁可以避免死锁的问题。
class PhonePlus {
    ReentrantLock lock = new ReentrantLock();
    public synchronized void sendEmail() {
        System.out.println(Thread.currentThread().getName() + "\t sendEmail...");
        sendMessasge();
    }

    public synchronized void sendMessasge() {
        System.out.println(Thread.currentThread().getName() + "\t sendMessage...");
    }

    public void method01() {
        lock.lock();
        try {
            System.out.println(Thread.currentThread().getName() + "\t method01...");
            method02();
        } finally {
            lock.unlock();
        }
    }

    public void method02() {
        lock.lock();
        try {
            System.out.println(Thread.currentThread().getName() + "\t method02...");
        } finally {
            lock.unlock();
        }
    }
}

public class ReentrantLockDemo {
    public static void main(String[] args) {
        PhonePlus phonePlus = new PhonePlus();
        new Thread(() -> {
//            phonePlus.sendEmail();
            phonePlus.method01();
        }, "A").start();

        new Thread(() -> {
//            phonePlus.sendEmail();
            phonePlus.method01();
        }, "B").start();
    }
}
synchronized和ReentrantLock都是可重入锁。
自旋锁
所谓自旋锁,就是尝试获取锁的线程不会立即阻塞,而是采用循环的方式去尝试获取,自己在那儿一直循环获取,就像”自旋”一样。这样的好处是减少线程切换上下文的开销,缺点是会消耗CPU。CAS底层的getAndAddInt就是自旋锁思想。
class WC {
    AtomicReference<Thread> atomicReference = new AtomicReference<>();

    public void lock() {
        Thread currentThread = Thread.currentThread();

        while (!atomicReference.compareAndSet(null, currentThread)) {
            System.out.println(Thread.currentThread().getName() + "\t 尝试中...");
            try {
                TimeUnit.SECONDS.sleep(1);
            } catch (InterruptedException e) {
                throw new RuntimeException(e);
            }
        }

        System.out.println(Thread.currentThread().getName() + "\t 获取锁...");
    }

    public void unlock() {
        Thread currentThread = Thread.currentThread();
        atomicReference.compareAndSet(currentThread, null);
        System.out.println(Thread.currentThread().getName() + "\t 解锁...");
    }
}
public class SpinLockDemo {
    public static void main(String[] args) {
        WC wc = new WC();

        new Thread(() -> {
            wc.lock();
            try {
                TimeUnit.SECONDS.sleep(5);
            } catch (InterruptedException e) {
                throw new RuntimeException(e);
            }
            wc.unlock();
        }, "A").start();

        new Thread(() -> {
            wc.lock();
            try {
                TimeUnit.SECONDS.sleep(2);
            } catch (InterruptedException e) {
                throw new RuntimeException(e);
            }
            wc.unlock();
        }, "B").start();
    }
}
读写锁/独占锁/共享锁
读锁是共享的,写锁是独占的。juc.ReentrantLock和synchronized都是独占锁,独占锁就是一个锁智能被一个线程所持有。有的时候,需要读写分离,那么就要引入读写锁,即juc.ReentrantReadWriteLock。
独占锁:指该锁一次智能被一个线程所持有,对ReentrantLock和Synchronized而言都是独占锁。
共享锁:指该锁可悲多个线程所持有。
对ReentrantReadWriteLock其读锁是共享锁,其写锁是独占锁。
该锁的共享锁可保证并发读是非常高效的,读写、写读、写写的过程是互斥的。
比如缓存,就需要读写锁来控制。缓存就是一个键值对,一下Demo模拟了缓存的读写操作,读的get方法使用了ReentrantReadWriteLock.ReadLock(),写的put方法使用了ReentrantReadWriteLock.WriteLock()。这样避免了写被打断,实现了多个线程同时读。
class Cache {
    private final Map<String, Object> map = new ConcurrentHashMap<>();
    private final ReentrantReadWriteLock reentrantReadWriteLock = new ReentrantReadWriteLock();

    /**
     * 记录那个线程来签字
     * @param key 线程名
     * @param value 签字内容
     */
    public void put(String key, Object value) {
        reentrantReadWriteLock.writeLock().lock();
        try {
            System.out.println(key + "正在签字:" + value);
            // 耗时操作
            try {
                TimeUnit.SECONDS.sleep(1);
            } catch (InterruptedException e) {
                throw new RuntimeException(e);
            }
            map.put(key, value);
            System.out.println("签字完成");
        } finally {
            reentrantReadWriteLock.writeLock().unlock();
        }
    }

    public Object get(String key) {
        Object result = null;
        reentrantReadWriteLock.readLock().lock();
        try {
            System.out.println(key + "正在看签字");
            // 耗时操作
            try {
                TimeUnit.SECONDS.sleep(2);
            } catch (InterruptedException e) {
                throw new RuntimeException(e);
            }
            result = map.get(key);
            System.out.println("看完了");
        } finally {
            reentrantReadWriteLock.readLock().unlock();
        }
        return result;
    }
}

public class ReadWriteLockDemo {
    public static void main(String[] args) {
        Cache cache = new Cache();
        for (int i = 1; i <= 5; i++) {
            final int temp = i;
            new Thread(() -> {
                cache.put("线程名" + temp, "数据" + temp);
            }, String.valueOf(i)).start();
        }

        for (int i = 1; i <= 5; i++) {
            final int temp = i;
            new Thread(() -> {
                cache.get("线程名" + temp);
            }, String.valueOf(i)).start();
        }
    }
}
阻塞队列
概念:
- 在多线程领域:所谓阻塞,在某些情况下会挂起线程(即阻塞),一旦条件满足,被挂起的线程又会自动被唤醒。
- 阻塞队列是一个队列,在数据结构中起的作用如下图:
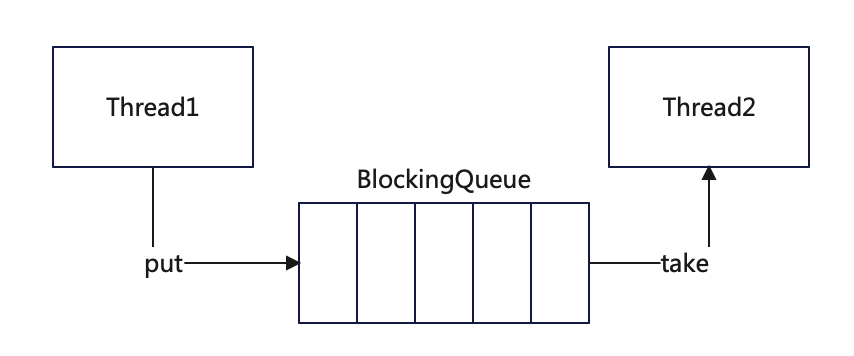
当队列是空的,从队列中获取(take)元素的操作将会被阻塞。
当队列是满的,向队列中添加(put)元素的操作将会被阻塞。
试图从空的队列中获取元素的线程将会被阻塞,知道其他线程往空的队列中插入新的元素。
试图向满的队列中添加新元素的线程将会被阻塞,知道其他线程中队列中逸出一个或多个元素活着完全情况,使队列空闲起来后并后续新增。
好处:阻塞队列不用手动控制什么时候被阻塞,什么时候改被唤醒,简化了操作。
体系:Collection->Queue->BlockingQueue->七个阻塞队列实现类
| 类名 | 特点 |
| ArrayBlockingQueue | 由数组结构构成的有界阻塞队列 |
| LinkedBlockingQueue | 由链表结构构成的有界(默认值为Integer.MAX_VALUE)阻塞队列 |
| PriorityBlockingQueue | 支持优先级排序的无界阻塞队列 |
| DelayQueue | 使用优先级队列实现的延迟无界阻塞队列 |
| SynchronousQueue | 不存储元素的阻塞队列,也即单个元素的队列 |
| LinkedTransferQueue | 由链表构成的无界阻塞队列 |
| LinkedBlockingDeque | 由链表构成的双向阻塞队列 |
| 方法类型 | 抛出异常 | 返回布尔 | 阻塞 | 超时 |
| 插入 | add(E e) | offer(E e) | put(E e) | offer(E e, time, timeUnit) |
| 取出 | remove() | poll() | take() | poll(Time, TimeUnit) |
| 队首 | element() | peek() | 无 | 无 |
- 抛出异常是指当队列满时,再次插入会抛出异常;
- 返回布尔是指当队列满时,再次插入会返回false;阻塞是指当队列满时,再次插入会被阻塞,知道队列出一个元素,才能插入。超时是指当一个时限过后,才会插入或者取出。
public class BlockingQuereDemo {
    public static void main(String[] args) throws InterruptedException {
        BlockingQueue<String> queue = new ArrayBlockingQueue<>(3);

//        addAndRemove(queue);

//        offerAndPoll(queue);

//        putAndTake(queue);

        outOfTime(queue);
    }

    private static void outOfTime(BlockingQueue<String> queue) throws InterruptedException {
        System.out.println(queue.offer("AA", 2, TimeUnit.SECONDS));
        System.out.println(queue.offer("BB", 2, TimeUnit.SECONDS));
        System.out.println(queue.offer("CC", 2, TimeUnit.SECONDS));
        System.out.println(queue.offer("DD", 2, TimeUnit.SECONDS));

        System.out.println(queue.poll(4, TimeUnit.SECONDS));
        System.out.println(queue.poll(4, TimeUnit.SECONDS));
        System.out.println(queue.poll(4, TimeUnit.SECONDS));
        System.out.println(queue.poll(4, TimeUnit.SECONDS));
    }

    private static void putAndTake(BlockingQueue<String> queue) throws InterruptedException {
        queue.put("aa");
        queue.put("bb");
        queue.put("cc");
        queue.put("dd");

        System.out.println(queue.take());
        System.out.println(queue.take());
        System.out.println(queue.take());
        System.out.println(queue.take());
    }

    private static void offerAndPoll(BlockingQueue<String> queue) {
        System.out.println(queue.offer("aa"));
        System.out.println(queue.offer("bb"));
        System.out.println(queue.offer("cc"));
        System.out.println(queue.offer("dd"));

        System.out.println(queue.peek());

        System.out.println(queue.poll());
        System.out.println(queue.poll());
        System.out.println(queue.poll());
        System.out.println(queue.poll());
    }

    private static void addAndRemove(BlockingQueue<String> queue) {
        queue.add("a");
        queue.add("b");
        queue.add("c");
//        queue.add("d");

        System.out.println(queue.element());

        System.out.println(queue.remove());
        System.out.println(queue.remove());
        System.out.println(queue.remove());
        System.out.println(queue.remove());
    }
}
public class SynchronousQueueDemo {
public static void main(String[] args) {
BlockingQueue<String> blockingQueue = new SynchronousQueue<>();
new Thread(() -> {
try {
blockingQueue.put("1");
System.out.println(Thread.currentThread().getName() + "put 1");
blockingQueue.put("2");
System.out.println(Thread.currentThread().getName() + "put 2");
blockingQueue.put("3");
System.out.println(Thread.currentThread().getName() + "put 3");
} catch (InterruptedException e) {
throw new RuntimeException(e);
}
}, "师傅").start();
new Thread(() -> {
try {
blockingQueue.take();
System.out.println(Thread.currentThread().getName() + "take 1");
blockingQueue.take();
System.out.println(Thread.currentThread().getName() + "take 2");
blockingQueue.take();
System.out.println(Thread.currentThread().getName() + "take 3");
} catch (InterruptedException e) {
throw new RuntimeException(e);
}
}, "客户").start();
}
}阻塞队列的应用-生产者消费者
synchronized实现
class MyResource {
    // 用于记录包子数量
    int number = 0;

    public synchronized void increment() throws InterruptedException {
        while (number != 0) {
            this.wait();
        }

        number++;
        System.out.println(Thread.currentThread().getName() + "\t" + number);

        this.notifyAll();
    }

    public synchronized void decrement() throws InterruptedException {
        while (number == 0) {
            this.wait();
        }

        number--;
        System.out.println(Thread.currentThread().getName() + "\t" + number);

        this.notifyAll();
    }
}

public class ProdConsDemo {
    public static void main(String[] args) {
        MyResource myResource = new MyResource();

        new Thread(() -> {
            for (int i = 0; i < 10; i++) {
                try {
                    myResource.increment();
                } catch (InterruptedException e) {
                    throw new RuntimeException(e);
                }
            }
        }, "师傅1").start();

        new Thread(() -> {
            for (int i = 0; i < 10; i++) {
                try {
                    myResource.increment();
                } catch (InterruptedException e) {
                    throw new RuntimeException(e);
                }
            }
        }, "师傅2").start();

        new Thread(() -> {
            for (int i = 0; i < 10; i++) {
                try {
                    myResource.decrement();
                } catch (InterruptedException e) {
                    throw new RuntimeException(e);
                }
            }
        }, "顾客1").start();

        new Thread(() -> {
            for (int i = 0; i < 10; i++) {
                try {
                    myResource.decrement();
                } catch (InterruptedException e) {
                    throw new RuntimeException(e);
                }
            }
        }, "顾客2").start();
    }
}
lock实现(精准通知顺序访问)

class ShareData {
    Lock lock = new ReentrantLock();
    Condition c1 = lock.newCondition();
    Condition c2 = lock.newCondition();
    Condition c3 = lock.newCondition();

    int state = 1;

    public void printC1() {
        lock.lock();
        try {
            while (state != 1) {
                System.out.println("c1尝试获取锁失败");
                c1.await();
            }
            state = 2;
            for (int i = 0; i < 1; i++) {
                System.out.println(Thread.currentThread().getName() + "\t" + i);
            }
            c2.signalAll();
        } catch (InterruptedException e) {
            throw new RuntimeException(e);
        } finally {
            lock.unlock();
        }
    }

    public void printC2() {
        lock.lock();
        try {
            while (state != 2) {
                System.out.println("c2尝试获取锁失败");
                c2.await();
            }
            state = 3;
            for (int i = 0; i < 2; i++) {
                System.out.println(Thread.currentThread().getName() + "\t" + i);
            }
            c3.signalAll();
        } catch (InterruptedException e) {
            throw new RuntimeException(e);
        } finally {
            lock.unlock();
        }
    }

    public void printC3() {
        lock.lock();
        try {
            while (state != 3) {
                System.out.println("c3尝试获取锁失败");
                c3.await();
            }
            state = 1;
            for (int i = 0; i < 3; i++) {
                System.out.println(Thread.currentThread().getName() + "\t" + i);
            }
            c1.signalAll();
        } catch (InterruptedException e) {
            throw new RuntimeException(e);
        } finally {
            lock.unlock();
        }
    }
}
public class ConditionDemo {
    public static void main(String[] args) {
        ShareData shareData = new ShareData();

        new Thread(() -> {
            for (int i = 0; i < 10; i++) {
                shareData.printC1();
            }
        }, "A").start();

        new Thread(() -> {
            for (int i = 0; i < 10; i++) {
                shareData.printC2();
            }
        }, "B").start();

        new Thread(() -> {
            for (int i = 0; i < 10; i++) {
                shareData.printC3();
            }
        }, "C").start();
    }
}
Synchrinized和Lock区别
- 原始构成。sync是JVM层面的,底层通过monitorenter和monitorexit来实现的。Lock是JDK API层面的。
- 使用方法。sync不需要手动释放锁,而Lock需要手动释放。
- 是否可终端。sync不可中断,除非抛出异常或者正常运行完成。Lock是可中断的,通过调用interrupt()方法。
- 是否为公平锁。sync只能是非公平锁,而Lock既能是公平锁,又能是非公平锁。
- 绑定多个条件。sync不能,只能随机唤醒。而Lock可以通过Condition来绑定多个条件,精确唤醒。
阻塞队列模式生产者消费者
为什么需要BlockingQueue?
好处是我们不需要关心什么时候需要阻塞线程,什么时候需要唤醒线程,因为这一切BlockingQueue都给你一手包办好了,使用阻塞队列后就不需要手动加锁了。
在Concurrent包发布之前,在多线程环境下,我们每个城需要都必须去自己控制这些细节,尤其还要兼顾效率和线程安全,而这会给我们的程序带来不小的复杂的。
class MyRes {
    private volatile boolean flag = true;
    private AtomicInteger atomicInteger = new AtomicInteger();

    BlockingQueue<String> blockingQueue = new ArrayBlockingQueue<>(3);

    public void produce() throws InterruptedException {
        while (flag) {
            String data = atomicInteger.incrementAndGet() + "";
            boolean result = blockingQueue.offer(data, 2, TimeUnit.SECONDS);
            if (result) {
                System.out.println(Thread.currentThread().getName() + "\t 插入队列" + data + "...生产成功");
            } else {
                System.out.println(Thread.currentThread().getName() + "\t 插入队列" + data + "...生产失败");
            }
            TimeUnit.SECONDS.sleep(1);
        }
        System.out.println(Thread.currentThread().getName() + "\t 停工生产");
    }

    public void consume() throws InterruptedException {
        while (flag) {
            String result = blockingQueue.poll(2, TimeUnit.SECONDS);
            if (result == null || "".equals(result)) {
                System.out.println(Thread.currentThread().getName() + "\t 没有买到...");
                return;
            }
            System.out.println(Thread.currentThread().getName() + "\t 购买成功...");
        }
    }

    public void stop() {
        try {
            TimeUnit.SECONDS.sleep(5);
        } catch (InterruptedException e) {
            throw new RuntimeException(e);
        }
        System.out.println("停工");
        flag = false;
    }
}

public class ProdConsBlockingQueueDemo {

    public static void main(String[] args) {
        MyRes myRes = new MyRes();

        new Thread(() -> {
            System.out.println(Thread.currentThread().getName() + "\t 生产线程启动...");
            try {
                myRes.produce();
            } catch (InterruptedException e) {
                throw new RuntimeException(e);
            }
        }, "师傅A").start();

        new Thread(() -> {
            System.out.println(Thread.currentThread().getName() + "\t 生产线程启动...");
            try {
                myRes.produce();
            } catch (InterruptedException e) {
                throw new RuntimeException(e);
            }
        }, "师傅B").start();

        new Thread(() -> {
            System.out.println(Thread.currentThread().getName() + "\t 消费线程启动...");
            try {
                myRes.consume();
            } catch (InterruptedException e) {
                throw new RuntimeException(e);
            }
        }, "顾客A").start();

        new Thread(() -> {
            System.out.println(Thread.currentThread().getName() + "\t 消费线程启动...");
            try {
                myRes.consume();
            } catch (InterruptedException e) {
                throw new RuntimeException(e);
            }
        }, "顾客B").start();

        new Thread(() -> {
            System.out.println(Thread.currentThread().getName() + "\t 消费线程启动...");
            try {
                myRes.consume();
            } catch (InterruptedException e) {
                throw new RuntimeException(e);
            }
        }, "顾客C").start();

        new Thread(() -> {
            System.out.println(Thread.currentThread().getName() + "\t 消费线程启动...");
            try {
                myRes.consume();
            } catch (InterruptedException e) {
                throw new RuntimeException(e);
            }
        }, "顾客D").start();

        myRes.stop();
    }
}
发表回复